[cs_content][cs_section parallax=”false” separator_top_type=”none” separator_top_height=”50px” separator_top_angle_point=”50″ separator_bottom_type=”none” separator_bottom_height=”50px” separator_bottom_angle_point=”50″ style=”margin: 0px;padding: 50px 0px 10px;”][cs_row inner_container=”true” marginless_columns=”false” style=”margin: 0px auto;padding: 0px;”][cs_column fade=”false” fade_animation=”in” fade_animation_offset=”45px” fade_duration=”750″ type=”1/1″ style=”padding: 0px;”][x_image type=”none” src=”https://www.dwrl.utexas.edu/wp-content/uploads/2016/11/keyboard-621832_960_720.jpg” alt=”Close-up shot of a black keyboard on which rests a pen and a crumpled up piece of paper.” link=”false” href=”#” title=”” target=”” info=”none” info_place=”top” info_trigger=”hover” info_content=””][/cs_column][/cs_row][/cs_section][cs_section bg_color=”hsl(0, 0%, 100%)” parallax=”false” separator_top_type=”none” separator_top_height=”50px” separator_top_angle_point=”50″ separator_bottom_type=”none” separator_bottom_height=”50px” separator_bottom_angle_point=”50″ class=”cs-ta-left” style=”margin: 0px;padding: 45px 0px;”][cs_row inner_container=”true” marginless_columns=”false” style=”margin: 0px auto;padding: 0px;”][cs_column fade=”false” fade_animation=”in” fade_animation_offset=”45px” fade_duration=”750″ type=”2/3″ style=”padding: 0px;”][cs_text]An important component in the composition process is peer reviews. In fact, it’s a requirement for RHE 306 courses. But when instructors assign digital writing assignments–particularly those like infographics that have a visual component beyond alphanumeric text–a question emerges as to how students can best provide helpful feedback.
In “Can You Hear Us Now,” Julie Reynolds and Vicki Russell argue that audio-recorded feedback on student writing encourages them as instructors to “focus less on lower-order writing concerns (such as spelling, punctuation, and grammar) than on higher-order writing concerns (such as the structure of arguments, overall organization, and use of sources)” (31). Additionally, audio feedback enables them to emphasize the nuances of their comments and the complexities of the choices students made and will make moving forward. Conducting a study where their students used audio recording for peer reviews, Reynolds and Russell maintain that students created higher quality reviews via audio feedback, but they tended to prefer writing and receiving written feedback, with students noting that it was difficult to both organize their ideas orally as reviewers and to process the information in the recording as writers (34-5). Despite student misgivings, Reynolds and Russell argue that audio feedback is beneficial, believing that student discomfort in providing and interpreting feedback can indicate a different critical engagement experience that students may not be accustomed to with written feedback.
More recently, in “Talking with Students through Screencasting,” Riki Thompson and Meredith J. Lee consider the impact of instructors providing feedback via screencasting software (I refer to this as “screen recording” below). They argue that screencasting feedback can facilitate a more personalized and conversational experience between instructor and student, which can help students interpret feedback as encouragement rather than detached criticism.
It’s important to note that both of these studies discuss the benefits (and frustrations) of using non-print feedback on traditional, print-based student writing. But when students are tasked to compose and revise multimodal compositions–for instance, infographics that contain data visualizations–it serves that they should also be able to review those texts in kind.[/cs_text][x_custom_headline level=”h3″ looks_like=”h5″ accent=”false”]Learning Objectives[/x_custom_headline][cs_text]This lesson introduces students to an audiovisual peer review experience through Apple’s QuickTime screen recording software. Assuming students have already engaged in some form of alphanumeric peer reviews, the lesson is meant for classes that include a unit on multimodal compositions, e.g., infographics. In this sense, the lesson serves to build off and potentially augment student (and instructor) understanding of peer review based on the shift in technology.
Students will:[/cs_text][cs_icon_list][cs_icon_list_item title=”Identify and discuss the affordances and limitations of alphanumeric as well as audiovisual peer reviews” type=”check” link_enabled=”false” link_url=”#” link_new_tab=”false”]Identify and discuss the affordances and limitations of alphanumeric as well as audiovisual peer reviews[/cs_icon_list_item][cs_icon_list_item title=”Collectively articulate and establish reviewing strategies as well as a template for reviews” type=”check” link_enabled=”false” link_url=”#” link_new_tab=”false”]Collectively articulate and establish reviewing strategies as well as a template for reviews[/cs_icon_list_item][cs_icon_list_item title=”Learn how to use screen recording software and share files with peers and the instructor” type=”check” link_enabled=”false” link_url=”#” link_new_tab=”false”]Learn how to use screen recording software and share files with peers and the instructor[/cs_icon_list_item][cs_icon_list_item title=”Record substantive, nuanced peer reviews” type=”check” link_enabled=”false” link_url=”#” link_new_tab=”false”]Record substantive, nuanced peer reviews[/cs_icon_list_item][/cs_icon_list][/cs_column][cs_column fade=”false” fade_animation=”in” fade_animation_offset=”45px” fade_duration=”750″ type=”1/3″ style=”padding: 0px 0px 0px 30px;”][x_feature_list][x_feature_box title=”Assignment Length” title_color=”” text_color=”” graphic=”icon” graphic_size=”40px” graphic_shape=”circle” graphic_color=”#ffffff” graphic_bg_color=”rgb(140, 140, 140)” align_h=”left” align_v=”top” side_graphic_spacing=”10px” max_width=”200px” child=”true” connector_width=”1 px” connector_style=”dashed” connector_color=”#272727″ graphic_icon=”clock-o”]Two class periods[/x_feature_box][x_feature_box title=”Required Materials” title_color=”” text_color=”” graphic=”icon” graphic_size=”40px” graphic_shape=”circle” graphic_color=”#ffffff” graphic_bg_color=”hsl(0, 0%, 56%)” align_h=”left” align_v=”top” side_graphic_spacing=”10px” max_width=”200px” child=”true” connector_width=”1 px” connector_style=”dashed” connector_color=”#272727″ graphic_icon=”cut”]DWRL Mac desktop computers with QuickTime screen recording software (built-in). Headsets checked out from DWRL offices. Google Drive accounts for students and instructor.[/x_feature_box][x_feature_box title=”Skills Necessary” title_color=”” text_color=”” graphic=”icon” graphic_size=”40px” graphic_shape=”circle” graphic_color=”#ffffff” graphic_bg_color=”rgb(140, 140, 140)” align_h=”left” align_v=”top” side_graphic_spacing=”10px” max_width=”200px” child=”true” connector_width=”1 px” connector_style=”dashed” connector_color=”#272727″ graphic_icon=”download”]Ability to use and teach students to use QuickTime screen recording as well as know how to upload and share files via Google Drive.[/x_feature_box][/x_feature_list][/cs_column][/cs_row][/cs_section][cs_section bg_color=”rgb(250, 250, 250)” parallax=”false” separator_top_type=”none” separator_top_height=”50px” separator_top_angle_point=”50″ separator_bottom_type=”none” separator_bottom_height=”50px” separator_bottom_angle_point=”50″ style=”margin: 0px 0px 0px 60px;padding: 10px 0px 45px;”][cs_row inner_container=”true” marginless_columns=”false” style=”margin: 0px auto;padding: 0px;”][cs_column fade=”false” fade_animation=”in” fade_animation_offset=”45px” fade_duration=”750″ type=”1/1″ style=”padding: 0px;”][x_feature_headline level=”h2″ looks_like=”h3″ icon=”globe”]Access and Adaptability[/x_feature_headline][x_gap size=”30px”][cs_text]The purpose of this lesson is to enable students to engage with infographics beyond the limitations of print-based writing, but this method of peer review should work with any type of digital writing. If instructors teach in a classroom without access to screen recording software but still ask their students to create multimodal compositions, students could review each other’s work through face-to-face conferences. In this sense, it may be beneficial to have students conduct peer reviews as they have with alphanumeric essays and supplement those texts with in-person communication.
[/cs_text][/cs_column][/cs_row][/cs_section][cs_section bg_color=”rgb(225, 229, 234)” parallax=”false” separator_top_type=”none” separator_top_height=”50px” separator_top_angle_point=”50″ separator_bottom_type=”none” separator_bottom_height=”50px” separator_bottom_angle_point=”50″ style=”margin: 0px 0px 0px 60px;padding: 10px 0px 45px;”][cs_row inner_container=”true” marginless_columns=”false” style=”margin: 0px auto;padding: 0px;”][cs_column fade=”false” fade_animation=”in” fade_animation_offset=”45px” fade_duration=”750″ type=”1/1″ style=”padding: 0px;”][x_feature_headline level=”h2″ looks_like=”h3″ icon=”cogs”]Assignment Description[/x_feature_headline][x_gap size=”30px”][cs_text]In this lesson, the class will write quick, print-based reviews of an infographic and discuss that experience. Afterwards, instructors will give students a brief tutorial on screen recordings and allow them to practice using the QuickTime software. Students will then create informal screen recordings where they review the same infographic as before. The class will then discuss this experience, and from this discussion the class will collectively create a peer review template to help students provide beneficial peer reviews through screen recording. Students then swap their infographic drafts with their review partners, and during the following class, they record and share their peer review recordings with their partners and the instructor. [/cs_text][x_custom_headline level=”h2″ looks_like=”h6″ accent=”false”]Sample Infographic Review Using Screen Recording. Video transcription available in description in YouTube.[/x_custom_headline][x_video_player type=”16:9″ src=”https://www.youtube.com/watch?v=vpLbFG_PpVU” hide_controls=”false” autoplay=”false” no_container=”false” preload=”none” advanced_controls=”false” muted=”false” loop=”false” poster=””][/cs_column][/cs_row][cs_row inner_container=”true” marginless_columns=”false” style=”margin: 0px auto;padding: 0px;”][cs_column fade=”false” fade_animation=”in” fade_animation_offset=”45px” fade_duration=”750″ type=”1/2″ style=”padding: 0px;”][x_custom_headline level=”h2″ looks_like=”h5″ accent=”false”]Instructor Preparation[/x_custom_headline][cs_icon_list][cs_icon_list_item title=”Know how to use QuickTime’s screen recording software, as well as how to upload and share videos via Google Docs” type=”check” link_enabled=”false” link_url=”#” link_new_tab=”false”]Know how to use QuickTime’s screen recording software, as well as how to upload and share videos via Google Docs[/cs_icon_list_item][cs_icon_list_item title=”Select an infographic for the peer review activity (unless you plan to ask for a volunteer)” type=”check” link_enabled=”false” link_url=”#” link_new_tab=”false”]Select an infographic for the peer review activity (unless you plan to ask for a volunteer)[/cs_icon_list_item][cs_icon_list_item title=”Check out microphone headsets from the DWRL office” type=”check” link_enabled=”false” link_url=”#” link_new_tab=”false”]Check out microphone headsets from the DWRL office[/cs_icon_list_item][/cs_icon_list][/cs_column][cs_column fade=”false” fade_animation=”in” fade_animation_offset=”45px” fade_duration=”750″ type=”1/2″ style=”padding: 0px;”][x_custom_headline level=”h2″ looks_like=”h5″ accent=”false”]Student Preparation[/x_custom_headline][cs_icon_list][cs_icon_list_item title=”Create a draft of an infographic, and be able to access it during the class” type=”check” link_enabled=”false” link_url=”#” link_new_tab=”false”]Create a draft of an infographic, and be able to access it during the class[/cs_icon_list_item][cs_icon_list_item title=”Write a brief cover letter concerning where they are in regards to their draft (e.g., what are they attempting to express with their draft, and what might be their next steps?). Include 3 questions or points of interest concerning what they’d like their partner to look at specifically (e.g., structural concerns, particular design elements, etc.).” type=”check” link_enabled=”false” link_url=”#” link_new_tab=”false”]Write a brief cover letter concerning where they are in regards to their draft (e.g., what are they attempting to express with their draft, and what might be their next steps?). Include 3 questions or points of interest concerning what they’d like their partner to look at specifically (e.g., structural concerns, particular design elements, etc.).[/cs_icon_list_item][/cs_icon_list][/cs_column][/cs_row][cs_row inner_container=”true” marginless_columns=”false” style=”margin: 0px auto;padding: 0px;”][cs_column fade=”false” fade_animation=”in” fade_animation_offset=”45px” fade_duration=”750″ type=”1/1″ style=”padding: 0px;”][x_custom_headline level=”h2″ looks_like=”h5″ accent=”false”]In-Class or Assignment Instructions[/x_custom_headline][cs_text]
- Students discuss their experiences with peer reviews: What works? What doesn’t? What do they like, and what do they struggle with as reviewers and as writers? What are the possibilities and constraints of alphanumeric reviews?
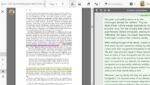
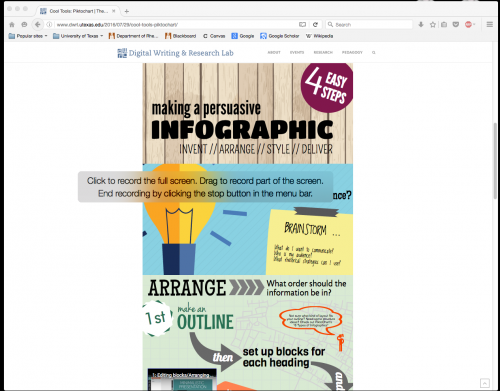
- Pull up an infographic on the projector. If instructors are asking students to create infographics, then they can use one of the examples provided at the start of the unit. Otherwise, instructors can easily find one online, or they could ask for a volunteer to share their draft with the class and receive extra feedback. Ask students to write a quick review of this infographic like they did in previous units (e.g., if instructors asked students in the previous unit[s] to write peer review letters, have them write an abridged review letter). Afterwards, ask a few students to read their reviews aloud, and then discuss the affordances and limitations of reviewing the infographic in this mode.
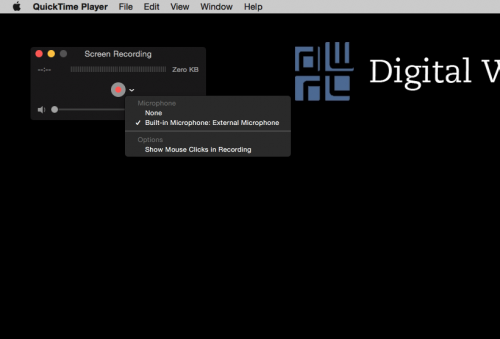
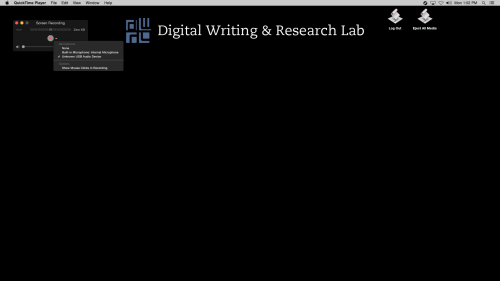
- Switch gears, and show students how to use QuickTime’s screen recording software, and give them a few minutes to practice using it.
- Ask students to review the infographic with the QuickTime screen recording software. Let them mess around recording both micro- and macro-level comments, as well as listening to their recordings. (The class will likely get loud at this time, but the microphone headsets available through the DWRL office do a good job of isolating commentary. In the Skills Workshop section, there’s important information on headsets.)
[/cs_text][x_image type=”none” src=”https://www.dwrl.utexas.edu/wp-content/uploads/2016/11/technology-music-sound-things.jpg” alt=”A pair of headphones lying on a table top. ” link=”false” href=”#” title=”” target=”” info=”none” info_place=”top” info_trigger=”hover” info_content=””][cs_text]
- Students discuss their experience. What worked, and what didn’t? How does this differ from alphanumeric feedback? What does it enable? What does it constrain? What are the concerns using screen recordings for peer reviews? What are some strategies for preparing for a screen recording? What are the affordances and limitations of having a scripted/prepared response, as opposed to an off-the-cuff review? Because QuickTime doesn’t allow for editing (and editing the recordings using other software would take too much time for this lesson), what are some ways students can react to “mistakes” in their recording, i.e., do they start it all over, or do they acknowledge if and when they misspoke and move beyond it? How might this influence their approach? What type of feedback do students want on their drafts?
- From this discussion, put together a peer review template as a class.
- Pair students up and have them electronically swap .pdfs of their infographics along with their draft cover letters (see “Student Preparation” in the right column of this lesson plan). If time remains, students can begin to look over their received draft and prepare their reviews.
- During the following class, students will record their reviews (using again DWRL microphone headsets). Instructors might consider requiring students to bring specific talking points to class in order to facilitate this process. At the same time, off-the-cuff reviews might have certain affordances that instructors wants to explore.
- Students upload and share their recordings with the writer and the instructor via Google Docs. Instructions are in the video below. (Uploading them to YouTube and emailing out the link is another option.)
[/cs_text][x_custom_headline level=”h2″ looks_like=”h6″ accent=”false”]Tutorial on uploading/sharing screen recording files via Google Docs. Video transcription available in description in YouTube.[/x_custom_headline][x_video_player type=”16:9″ src=”https://www.youtube.com/watch?v=8OcFbfeiagM” hide_controls=”false” autoplay=”false” no_container=”false” preload=”none” advanced_controls=”false” muted=”false” loop=”false” poster=””][/cs_column][/cs_row][/cs_section][cs_section bg_color=”rgb(250, 250, 250)” parallax=”false” separator_top_type=”none” separator_top_height=”50px” separator_top_angle_point=”50″ separator_bottom_type=”none” separator_bottom_height=”50px” separator_bottom_angle_point=”50″ style=”margin: 0px 0px 0px 60px;padding: 10px 0px 45px;”][cs_row inner_container=”true” marginless_columns=”false” style=”margin: 0px auto;padding: 0px;”][cs_column fade=”false” fade_animation=”in” fade_animation_offset=”45px” fade_duration=”750″ type=”1/1″ style=”padding: 0px;”][x_feature_headline level=”h2″ looks_like=”h3″ icon=”pencil”]Skills Workshop[/x_feature_headline][cs_text]This skills workshop includes three photo slidedecks. The first is teaches general QuickTime screen recording skills. The other two slidedecks discuss headphones that can be checked out through the DWRL. The second slidedeck focuses on headsets that plug into the computer’s headphone jack, and the third slidedeck deals with headphones that plug into the computer’s USB port. [/cs_text][x_custom_headline level=”h2″ looks_like=”h6″ accent=”false”]General tutorial on using QuickTime’s screen recording software:[/x_custom_headline][x_slider animation=”slide” slide_time=”7000″ slide_speed=”1000″ slideshow=”false” random=”false” control_nav=”true” prev_next_nav=”false” no_container=”false” ][x_slide]

[/x_slide][x_slide]
[/x_slide][x_slide]
[/x_slide][x_slide]
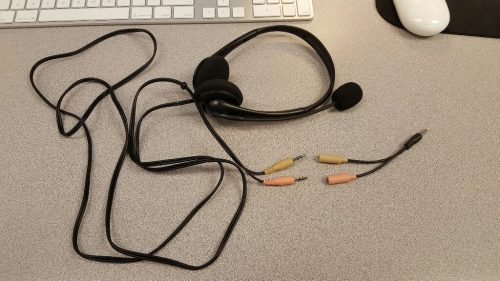
[/x_slide][/x_slider][cs_text]The DWRL has two classroom sets of headsets instructors can check out, and each works (a little) differently with QuickTime. The headsets that plug into a computer’s headphone jack are the best option. The microphone picks up audio clearly, and it does a great job zeroing out environmental noise. And because the headphones work, students can listen to recordings individually, i.e., quietly.
If you speak with an Assistant Director when you’re planning your class, they should be able to ensure we have enough of the headsets that plug into the headphone jack (including the necessary adapter discussed below). But on the chance that your class has to use both types, I’ve put together a quick tutorial for each.[/cs_text][x_custom_headline level=”h2″ looks_like=”h6″ accent=”false”]Information on “Y-cord” headsets that plug into the headphone jack:[/x_custom_headline][x_slider animation=”slide” slide_time=”7000″ slide_speed=”1000″ slideshow=”false” random=”false” control_nav=”true” prev_next_nav=”false” no_container=”false” ][x_slide]
[/x_slide][x_slide]

[/x_slide][x_slide]
[/x_slide][/x_slider][x_custom_headline level=”h2″ looks_like=”h6″ accent=”false”]Information on USB headsets:[/x_custom_headline][x_slider animation=”slide” slide_time=”7000″ slide_speed=”1000″ slideshow=”false” random=”false” control_nav=”true” prev_next_nav=”false” no_container=”true” ][x_slide]
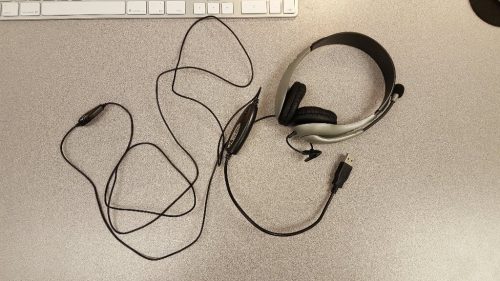
[/x_slide][x_slide]
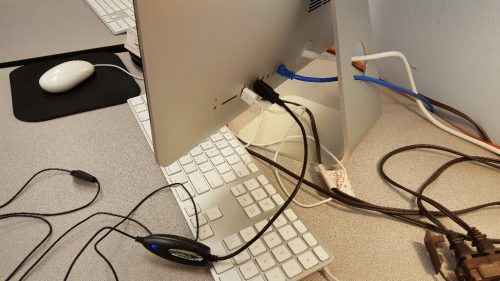
[/x_slide][x_slide]
[/x_slide][/x_slider][/cs_column][/cs_row][/cs_section][cs_section bg_color=”rgb(225, 229, 234)” parallax=”false” separator_top_type=”none” separator_top_height=”50px” separator_top_angle_point=”50″ separator_bottom_type=”none” separator_bottom_height=”50px” separator_bottom_angle_point=”50″ style=”margin: 0px 0px 0px 60px;padding: 10px 0px;”][cs_row inner_container=”true” marginless_columns=”false” style=”margin: 0px auto;padding: 0px;”][cs_column fade=”false” fade_animation=”in” fade_animation_offset=”45px” fade_duration=”750″ type=”1/1″ style=”padding: 0px;”][x_feature_headline level=”h2″ looks_like=”h3″ icon=”paperclip”]Assessment Suggestions[/x_feature_headline][x_gap size=”30px”][cs_text]Assessing what students learned by using screen recording software during class time will be done informally by way of the class discussion and the ensuing creation of the review template. In terms of the peer reviews they record, students should share the files with the instructor, who can assess the reviews based on the criteria established in the template.
[/cs_text][x_gap size=”20px”][x_tab_nav type=”two-up” float=”top”][x_tab_nav_item title=”Suggestions for Portfolio-Style Assessment” active=”true”][x_tab_nav_item title=”Suggestions for Traditional Assessment” active=”false”][/x_tab_nav][x_tabs][x_tab active=”true”]In addition to having students share the peer review they recorded, students can write a short reflection on their experience–both composing a review and receiving one. Students should discuss what they found helpful and what was not helpful. They should consider why they reacted the way they did and describe how this process might be improved in the future–both in terms of identifying personal mistakes and suggesting what they would do differently as well as theorizing how the use of screen recordings could be more effective overall. [/x_tab][x_tab active=”false”]Instructors can use the template in tandem with the writer’s cover letter to assess the quality of the reviews.[/x_tab][/x_tabs][cs_text](Feature image credit: “Keyboard, Pen, Plan, Success” by JeongGuHyeok via Creative Commons)[/cs_text][/cs_column][/cs_row][/cs_section][/cs_content]